So finally after having the car for 6 weeks, I was able to start building. The first mission was the front suspension and steering rack. Having had a chance to read a lot of other build diaries and learn from their adventures, the front wishbones and dampers went in with little fuss. All the bolts and nuts are only finger tight at this stage, and these will be tightened before I drop it onto its wheels, and then torqued correctly once on the ground.
Connecting the steering column to the steering rack spline proved to be an interesting task, as it would not press fit together easily and required a fair amount of persuasion to get it mated. I ended up having to remove the entire rack and the bottom half of the steering column and assemble it on the bench.
The bolt that finally secured it was also interesting and I suspect I will take it off and replace it in the near future. One lesson learnt from the hours of reading other builders blogs was not to tighten anything and pre fit everything first. This meant the steering rack only went in 3 times! I must be mellowing as these sort of issues that would have had me previously throwing tools and yelling expletives now merely cause me to chuckle and walk away only to come back later and solve easily.
 One thing I have come to rely on is other builders photos and descriptions as an invaluable source of truth. I have taken far more photos than are shown here, so if for some reason you find yourself using my build as a reference, feel free to drop me a line and I will share the other photos with you.
Once the uprights and calipers went on, it started to resemble a car (from front on anyway)!
 While the body was in paint I was keen to maintain progress, so I started working on sourcing an engine. The initial plan was to find a wrecked car for salvage on one of the auction sites, bring it home, strip out what I needed, and sell the rest!
Few problems. The auctions were very expensive and didn't have exactly what I was after, I didn't have the space to house another car, I didn't have the time to strip it and I din't have the first clue about what I needed or where to find it in the wrecked donor.
While the body was in paint I was keen to maintain progress, so I started working on sourcing an engine. The initial plan was to find a wrecked car for salvage on one of the auction sites, bring it home, strip out what I needed, and sell the rest!
Few problems. The auctions were very expensive and didn't have exactly what I was after, I didn't have the space to house another car, I didn't have the time to strip it and I din't have the first clue about what I needed or where to find it in the wrecked donor.
So using a shopping list supplied by Bryn (FigJam on Ozclubbies.com.au), I shopped around a few wreckers for late model write offs (rear first obviously). Thank goodness for P Platers!!!. FORMAZ spares at Smithfield had just received a 2009 Focus 2.0 litre with 13,000km on it that had been hit heavily from behind. The guys at FORMAZ were more more than happy to collect all the parts from my list, and crate them up for pickup for me. This saved a huge amount of time and embarrassment from not knowing what a charcoal canister looked like!. End result was an engine at home after 3 days of shopping, mounted on the stand waiting to be stripped. Two nights later it was stripped and cleaned and ready for some new go faster bits!
I was keen to get the main part of the tub (the chassis, scuttle, nose cone and bonnet) off to paint and back before Christmas so I could start working on the build over the Christmas holidays. The prep and painting was to be done by Josh from Kirrawee Prestige Smash Repairs. This was an important step as the body had suffered some pretty bad gouges from the shipping frame (ex factory) and the nose cone had a large gouge on one of the edges that had exposed fibres.
 My youngest son was in charge of colour selection, and we came up with an Audi Orange (as seen on the A3). The guys at Kirrawee Prestige Smash Repairs did a stellar job on the repairs (you can't see them!) and the paint is gorgeous. Throughout prep and paint Josh sent me photos of the mask up, the etch primer, the colour coats and the final clear coat while it was being baked. It will be complemented by gloss black fenders and accessories, as well as black wheels and brake calipers further along in the build. We picked it up Christmas eve (hell of a pressie!) and bought it home to recommence building.
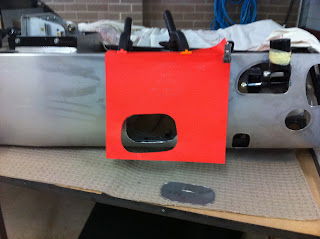 The Birkin does not come with a hole cut in the body for the extractors. Once you decide on your engine package, this then dictates which side and where the hole must be cut to accommodate the extractors. As I am going for a Duratec motor, the hole is on the right hand side. Brenton from Meridian Motorsports kindly provided a cardboard template for the required hole.
 I had read a lot of horror stories about cutting this particular hole, and I was more than a little concerned about undertaking cutting a hole in my new baby. Three days of false starts, and I settled on a 1mm Flexovit metal cutting wheel for the grinder. I cut a test line in the middle of the hole, and once I realised how easy it was, I roughed out the entire hole in about 5 minutes. That was the easy part!. I then tackled the remainder of the hole with a file to bring the cut back to the marked up line, and I then finished it up with a grinding/polishing wheel in the Dremel (which took 2 more nights to finish!). All in all not a bad result for something I was petrified of attempting.
As the Birkin comes with many of the major parts already fitted (bonnet, nose cone, scuttle, fuel tank) I set about stripping these parts out in order to get the main parts to the painter before Christmas.
Mid November, Brenton from Meridian tells me that the car has shipped, and TNT will have it available for pickup on Monday morning. This calls for a day of annual leave!
I race out to the depot to pick it up, only to be faced with a guy who didn't want me to have it. After arguing with him for 10 minutes, and then watching them use it as a forklift battering ram, I got it loaded on to the car trailer and home.
We took our time unpacking all the boxes and then offloaded the chassis into the garage. This allowed for the initial unveiling of the chassis as we removed the steel frame to see what we had gotten ourselves in for!
Please bear with me while I catch up on this blog. This saga begins in late October 2010, but I only started the diary just after Christmas 2010.
Once I had the sign off to undertake the build, the first step was to work out what I would build. A quick scan of Ozclubbies.com.au, and a several nights of browsing sites kept bringing me back to the Birkin site. The Birkin is often compared with the Caterham, and whilst it's at the upper end price wise of Clubman kits, I am a big believer in the premise that you usually get what you pay for.
So after several emails back and forward to Brenton at Meridian Motorsports in Melbourne, and an intro to Bryn, the NSW Distributor, the order is placed and the deposit is sent. I will be the proud owner of a Birkin S3 IRS chassis!
The Birkin gives me a multitude of engine options, a relatively large knowledge bank based on the cars already sold and being built, and it is largely all new parts and bespoke components custom made by Birkin rather than a mish mash of donor parts from various outdated cars.


