After the engine, the scuttle was the thing I was most looking forward to getting fitted. It signifies the end of a lot of work. It means all of the dash and wiring is completed and tested, and that the interior is completed. It is also the second largest piece of metal fitted to the car after the bonnet so its a big step.
Firstly the scuttle has a lot of different components and hardware fitted before its mounted. This includes the wiper motor drive arms, the wiper spindles, the washer nozzle, the washer hose, the washer bottle and the battery isolation switch. All this work is done on the bench (complete with Steve's foot which has not put in an appearance for a while). You will notice the manual in use, however as per usual it was put away soon after this shot and we winged it.
This shot shows the top of the scuttle with the wiper spindles exposed and the washer nozzle. The wiper mounts are polished metal, which will need to become black to fit in with everything else. As I will be mounting a Shift-I tacho light system on top of the scuttle (under the padding), I have wired some connectors into the existing tacho connector so that I can easily wire in the Shift-I later with the scuttle fitted. We also fitted rubber strips on the top of the body side where the scuttle sits.
From there is was just a matter of sitting the scuttle in place (about 4 times), lining up all the mounting holes, and then fixing the mounting brackets under the scuttle. The battery isolation switch fouled the bulkhead, so we removed some of the aluminum and smoothed out the bottom of the switch. We also drilled a small hole in the bottom of the steering column shim to allow the washer hose through to the washer bottle and pump.
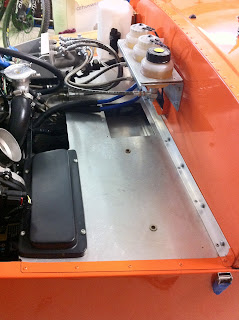
This photo shows the washer bottle and battery isolation switch mounted. Next will be the reservoirs, expansion tank, the Shift-I and the dash padding.
Oh, and I changed the wiper mounts to black too, which looks much better!
 The windscreen mounts were the first holes I drilled into my shiny new aluminum car back in 2010, before paint. Lining up the holes for windscreen mounts was a little tricky and it would be some time before I got to see if I had them right. The windscreen mounts and windscreen frame were painted gloss black at the time that the car was painted. Surprisingly the mounts fitted well with no modifications needed. I put them in finger tight so I could trial fit the windscreen. With the windscreen roughly in place, I could drill two holes in the scuttle either side for the windscreen demister. Then it was just a case of getting the rest of the family to hold the windscreen in place while I secured it inside the windscreen mounts.
  The windscreen fits fairly snugly, although there is a small gap between the bottom of the left mount and the screen which is making it hard to get the capscrew to bite into the thread. I will probably just use a longer capscrew for this. Tightening the screws damaged the paint a little on the mounts, so I will need to do a few touch ups and I will also paint all the cap screws black as well. Now its all torqued up correctly ready to be wired in. I can now fit the wiper arms onto the mounts as well.


